Table of Contents
- Getting Started
- EO.Pdf
- EO.Web
- EO.WebBrowser
- EO.Wpf
- Common Topics
- Reference EO.Total Dlls
- Adding EO controls to Visual Studio Toolbox
- Deployment
- Collecting Runtime Logs
- Collecting Crash Report
- Using DebugTools
- Using eowp.exe
- Troubleshooting Child Process Error
- Using EO.WebEngine JavaScript Interface
- Using with .NET Core (including .NET 5 and newer)
- Choosing between x86 build and x64 build
- Reference
| Adding EO controls to Visual Studio Toolbox |
EO.Total setup program should automatically add all EO controls to Visual Studio's toolbox. Occasionally you may find these controls missing from the toolbox due to various reasons such as:
- You used nuget packages instead of EO.Total installer;
- EO.Total installer did not function properly;
- Visual Studio installation is corrupted;
- Those items have been manually deleted;
In such cases you may need to manually add them into the toolbox. Follow these steps to add them into the toolbox:
- Open your project and the corresponding designer. For example, if you wish to add EO.Web Controls to the toolbox, then open the Web Form designer. This is necessary because Visual Studio will not enable toolbox items that the active designer can not use;
-
Right click in a blank area of the toolbox and then click Add Tab;
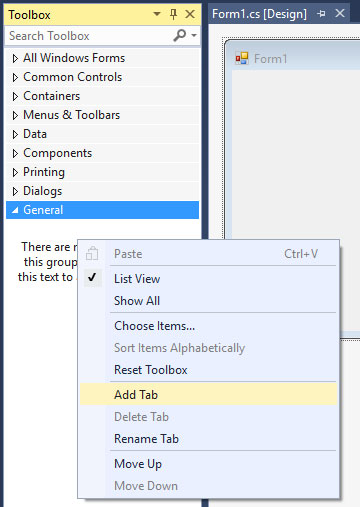
- Enter a name for the new tab. For example, "EO.Pdf";
-
Expand the newly created tab, right click the area under the tab name, then select
Choose Items...;
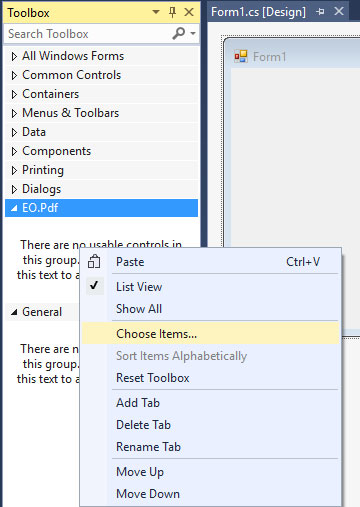
- Choose Toolbox Items dialog opens;
-
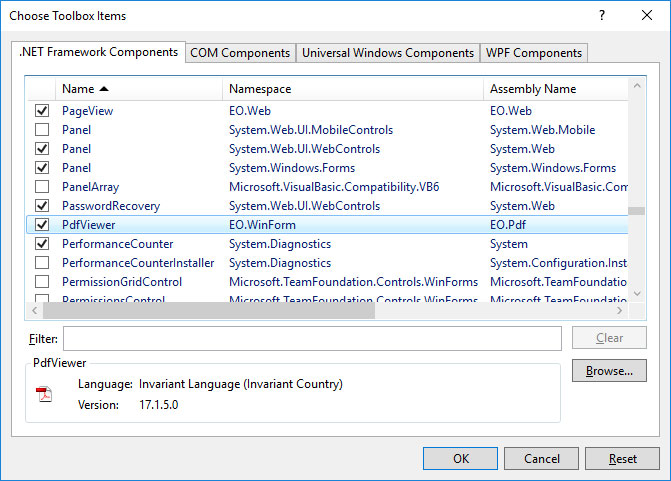
Select .NET Framework Component tab, then click Browse to browse one of
EO.Total DLLs (the default installation location is "c:\Program Files\Essential Objects\EO.Total xxxx" on 32 bit Windows and "c:\Program Files (x86)\Essential Objects\EO.Total xxxx" on 64 bit Windows, where "xxxx" is the version number). The following DLLs contains controls that you can add to the toolbox:
DLL Remarks EO.Pdf.dll Contains EO.WinForm.PdfViewer control EO.Web.dll Contains all EO.Web controls, including ASPXToPDF control. EO.WebBrowser.dll Contains EO.WinForm.WebControl -
After selecting one of the above DLL, the available controls in that DLL will be added into the list and selected. The following
screen shot demonstrates EO.WinForm.PdfViewer control is selected when EO.Pdf.dll is selected:
- Click OK to close the dialog, the control(s) selected should appear in the toolbox.