Table of Contents
- Getting Started
- EO.Pdf
- EO.Web
- Overview
- Installation & Deployement
- EO.Web ToolTip
- EO.Web Rating
- EO.Web Slider & RangeSlider
- EO.Web ListBox
- EO.Web ComboBox
- EO.Web Captcha
- EO.Web ASPX To PDF
- EO.Web Slide
- EO.Web Flyout
- EO.Web EditableLabel
- EO.Web ImageZoom
- EO.Web Floater
- EO.Web Downloader
- EO.Web ColorPicker
- EO.Web HTML Editor
- EO.Web File Explorer
- EO.Web SpellChecker
- EO.Web Grid
- EO.Web MaskedEdit
- EO.Web Splitter
- EO.Web Menu
- EO.Web Slide Menu
- EO.Web TabStrip
- EO.Web TreeView
- EO.Web Calendar
- EO.Web Callback
- EO.Web MultiPage
- EO.Web Dialog
- EO.Web AJAXUploader
- EO.Web ProgressBar - Free!
- EO.Web ToolBar - Free!
- EO.WebBrowser
- EO.Wpf
- Common Topics
- Reference
| Walkthrough: Creating a Tabbed Dialog |
Overview
You can use TabStrip and MultiPage together to create a tabbed dialog. This walkthrough includes detail steps to create the following tabbed dialog:
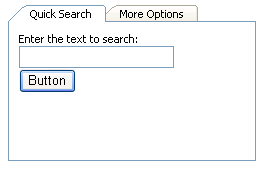
In order to create this tabbed dialog, add a TabStrip and a MultiPage control into the page, then link the TabStrip with the MultiPage by setting the TabStrip 's MultiPageID to the ID of the MultiPage control.
To Add the TabStrip control
Follow these steps to add the TabStrip control:- In Visual Studio.NET's design view, drag an EO.Web TabStrip onto the Web Form;
- Right click the TabStrip control, select "TabStrip Builder" from the designer context menu to open it;
- Select Yesto use the built-in skin, the TabStrip Builder switches to Skins tab;
- Select VS2005 skin, click Create From Skin, TabStrip Builder copies the skin and switches to the TabStrip tab;
- In TabStrip tab, delete the existing tab items, add two new tab items, change the tab item's Text property to "Quick Search" and "More Options";
- Click OK to close TabStrip Builder;
To Add the MultiPage control
Follow these steps to add the MultiPage control:
- In Visual Studio.NET's design view, drag an EO.Web MultiPage onto the Web Form;
- MultiPage is a container control. Drag two PageView controls into the MultiPage;
- The first PageView control is automatically associated with the first tab item "Simple Search". You can drop controls or type text on the PageView control as if it were a standard ASP.NET Panel control;
- Put some controls in the second PageView as well;
-
Switch to the HTML view, add the following CSS style to the MultiPage
control: "border-left: #7f9db9 1px solid; border-right:
#7f9db9 1px solid; border-bottom: #7f9db9 1px solid;", for example:
ASPX
<eo:MultiPage runat="server" id="MultiPage1"
    style="border-left: #7f9db9 1px solid; border-right: #7f9db9 1px solid; border-bottom: #7f9db9 1px solid">
    ....
</eo:MultiPage>
This style adds the left, right and bottom border that matches the TabStrip's bottom border. Note that If you use Visual Studio.NET, Visual Studio.NET might have already generated some style attributes for the MultiPage control, in which case the new border attributes should be appended to the style attribute list;
- Position MultiPage control so that it renders right below the TabStrip control;
- Change the PageView controls' Font property to "Tahoma, 8pt", the same as the TabStrip's font;
To Link the TabStrip and MultiPage
To link the TabStrip and MultiPage control, simply set the TabStrip's MultiPageID to the ID of the MultiPage control.
Test the Result
Now run the page and click on the tab item to switch pages.