Table of Contents
- Getting Started
- EO.Pdf
- EO.Web
- Overview
- Installation & Deployement
- EO.Web ToolTip
- EO.Web Rating
- EO.Web Slider & RangeSlider
- EO.Web ListBox
- EO.Web ComboBox
- EO.Web Captcha
- EO.Web ASPX To PDF
- EO.Web Slide
- EO.Web Flyout
- EO.Web EditableLabel
- EO.Web ImageZoom
- EO.Web Floater
- EO.Web Downloader
- EO.Web ColorPicker
- EO.Web HTML Editor
- EO.Web File Explorer
- EO.Web SpellChecker
- EO.Web Grid
- EO.Web MaskedEdit
- EO.Web Splitter
- EO.Web Menu
- EO.Web Slide Menu
- EO.Web TabStrip
- EO.Web TreeView
- EO.Web Calendar
- EO.Web Callback
- EO.Web MultiPage
- EO.Web Dialog
- EO.Web AJAXUploader
- EO.Web ProgressBar - Free!
- EO.Web ToolBar - Free!
- EO.WebBrowser
- EO.Wpf
- Common Topics
- Reference
| Partial page update through CallbackPanel |
Description
By using CallbackPanel, you can update a portion of the Web page without refreshing the whole page. This topic shows how to use EO.Web implement a simple to render updated content from the server.
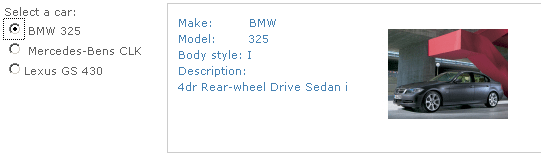
This demo has a backend database containing the "Car" information. When end user
selects a car, a callback request is sent to the server to retrieve the current
selected car information from database, and update only the "Car info area" of
the page. The page will look like:
To render content through CallbackPanel:
- Drag an EO.Web CallbackPanel onto the Web Form.
- Drag and drop several ASP.NET label controls in the CallbackPanel to construct the car info page.
- Right click the CallbackPanel control and click "Edit Triggers".
- In CallbackPanel Triggers Collection Editor, add three radio buttons as three triggers and specify parameter for each trigger.
- Double click the CallbackPanel control to hook up the "Execute" event in the code behind.
- In the code behind, design and implement the routine to handle the CallbackPanel's Execute event. In the following code, it retrieves the Car information from backend database and directly updates the Label control's Text property. Refer to sample location for the code.
- We're done! Build and browse the page.