Table of Contents
- Getting Started
- EO.Pdf
- EO.Web
- EO.WebBrowser
- EO.Wpf
- Overview
- Installation & Deployement
- Skin & Theme
- Common Taskes and Services
- EO.Wpf Buttons
- EO.Wpf Calendar & DatePicker
- EO.Wpf ComboBox
- EO.Wpf DockView
- EO.Wpf Gauge
- EO.Wpf ListBox
- EO.Wpf Menu
- EO.Wpf MaskedEdit
- EO.Wpf ProgressBar
- EO.Wpf Slider
- EO.Wpf SpinEdit
- EO.Wpf SplitView
- EO.Wpf TabControl
- EO.Wpf TreeView
- EO.Wpf Utility Controls
- EO.Wpf WindowChrome
- Sample Data Objects
- Common Topics
- Reference
| Using WindowChrome |
Overview
This section covers the following topics:
Getting Started
To use EO.Wpf WindowChrome, simply place it as the one and only child element of your Window element. Your window contents would then be placed as child element of the WindowChrome element. For example:
<Window x:Class="Window1"
        xmlns="http://schemas.microsoft.com/winfx/2006/xaml/presentation"
        xmlns:PresentationOptions="http://schemas.microsoft.com/winfx/2006/xaml/presentation/options"
        xmlns:x="http://schemas.microsoft.com/winfx/2006/xaml"
        xmlns:eo="clr-namespace:EO.Wpf;assembly=EO.Wpf"
        Title="Window1"
        Height="300"
        Width="350">
    <eo:WindowChrome>
        ...your window contents here....
    </eo:WindowChrome>
</Window>
Once a WindowChrome is placed into the window, the window's client area extends to overlap with the windows' title area, so you can place other UI elements in the Windows' title area. For example, the following code places three solid color circles in the window's title area:
<Window x:Class="Window1"
        xmlns="http://schemas.microsoft.com/winfx/2006/xaml/presentation"
        xmlns:x="http://schemas.microsoft.com/winfx/2006/xaml"
        xmlns:r="clr-namespace:EO.Wpf.Ribbon.Controls;assembly=EO.Wpf"
        xmlns:eo="clr-namespace:EO.Wpf;assembly=EO.Wpf"
        Title="Window1"
        Height="300"
        Width="350">
    <eo:WindowChrome>
        <DockPanel>
            <StackPanel DockPanel.Dock="Top" Orientation="Horizontal">
                <Ellipse Width="20" Height="20" Fill="Red" HorizontalAlignment="Left" Margin="2"></Ellipse>
                <Ellipse Width="20" Height="20" Fill="Green" HorizontalAlignment="Left" Margin="2"></Ellipse>
                <Ellipse Width="20" Height="20" Fill="Yellow" HorizontalAlignment="Left" Margin="2"></Ellipse>
            </StackPanel>
            <Grid Background="White"></Grid>
        </DockPanel>
    </eo:WindowChrome>
</Window>
The above code produces the window below:
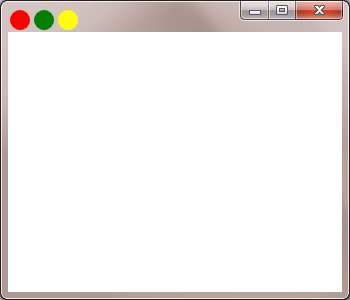
Note the circles are rendered in the window's title area.
Customizing Title Area Behavior
Using WindowChrome extend the window's client area to overlap with the window's title area, thus allowing you to place elements into the window's title area to alter the title area's appearance. However, the title area still functions as title area by default. In the previous sample, dragging the circles would have the same result as dragging anywhere else in the title area --- moving the window. In case you only want to place static information such as shapes or text into the title area, this is the desired behavior. However in case you want to place interactive controls, such as a button into the title area, the button has to be able to handle mouse event in its own way.
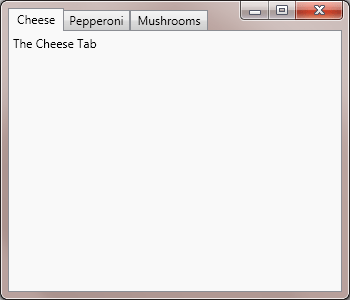
To enable an element to handle mouse event in its own way, set WindowChrome.IsClientElement attached property to true. For example, the following code places a tab controls into the title area. In order for the tab control to response mouse event, WindowChrome.IsClientElement is set to true on the tab control.
<Window x:Class="Window1"
        xmlns="http://schemas.microsoft.com/winfx/2006/xaml/presentation"
        xmlns:x="http://schemas.microsoft.com/winfx/2006/xaml"
        xmlns:r="clr-namespace:EO.Wpf.Ribbon.Controls;assembly=EO.Wpf"
        xmlns:eo="clr-namespace:EO.Wpf;assembly=EO.Wpf"
        Title="Window1"
        Height="300"
        Width="350">
    <eo:WindowChrome>
        <Grid>
            <TabControl eo:WindowChrome.IsClientElement="True">
                <TabItem Header="Cheese">
                    The Cheese Tab
                </TabItem>
                <TabItem Header="Pepperoni">
                    The Pepperoni Tab
                </TabItem>
                <TabItem Header="Mushrooms">
                    The Mushrooms Tab
                </TabItem>
            </TabControl>
        </Grid>
    </eo:WindowChrome>
</Window>
The above code produces the following result:
The tab control would not be able to respond to mouse event without setting WindowChrome.IsClientElement to true:
Customizing Title Area Height
By default, a WindowChrome element honors the default window title height. You can change the window title's height either by setting WindowChrome.TitleHeight or WindowChrome.TitleElement. When TitleHeight is set, area within that height is regarded as title area. When TitleElement is set, area above the element's bottom edge is regarded as title area.