Table of Contents
- Getting Started
- EO.Pdf
- EO.Web
- Overview
- Installation & Deployement
- EO.Web ToolTip
- EO.Web Rating
- EO.Web Slider & RangeSlider
- EO.Web ListBox
- EO.Web ComboBox
- EO.Web Captcha
- EO.Web ASPX To PDF
- EO.Web Slide
- EO.Web Flyout
- EO.Web EditableLabel
- EO.Web ImageZoom
- EO.Web Floater
- EO.Web Downloader
- EO.Web ColorPicker
- EO.Web HTML Editor
- EO.Web File Explorer
- EO.Web SpellChecker
- EO.Web Grid
- EO.Web MaskedEdit
- EO.Web Splitter
- EO.Web Menu
- EO.Web Menu
- Product Feature List
- Performance Tips
- Quick Start Guide
- Using EO.Web Menu
- Understanding built-in styles
- EO.Web Slide Menu
- EO.Web TabStrip
- EO.Web TreeView
- EO.Web Calendar
- EO.Web Callback
- EO.Web MultiPage
- EO.Web Dialog
- EO.Web AJAXUploader
- EO.Web ProgressBar - Free!
- EO.Web ToolBar - Free!
- EO.WebBrowser
- EO.Wpf
- Common Topics
- Reference
| Quick start: How to create a page bound context menu |
Overview
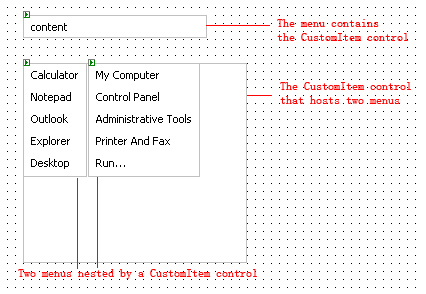
You can create a menu with any ASP.NET control nested in a navigation item, including another EO.Web menu. You can use HTML to arrange the layout of the controls inside the custom item. One usage of nesting controls is nesting menus. For example, to create a Web replica of Windows XP start menu, you can put two vertical menus as the sub menu of the "Start" navigation item.This section demonstrates how to create nesting menus. Steps to nest other ASP.NET server control are essentially the same.
Create a menu with nesting menus
Use the following steps to create a nesting menu in Visual Studio:-
Drag an EO.Web CustomItem control
 from the toolbox and drop it on the page;
-
Drag an EO.Web Menu control
 from the toolbox and drop it into the CustomItem control you
just created;
from the toolbox and drop it into the CustomItem control you
just created;
You can also drag other ASP.NET web server controls into the CustomItem control;
- You can go to HTML view to add HTML Tags inside the CustomItem control tag to arrange the layout of the controls;
- After finishing the CustomItem, you can drag a Menu control from the toolbox and drop it on the page;
- Use Menu Builder to create the menu structure;
- Set a navigation item's CustomItemID property to the ID of the CustomItem control you created;
- Run the page and check the result. Note you can not preview a custom item in Menu Builder.