Table of Contents
- Getting Started
- EO.Pdf
- EO.Web
- EO.WebBrowser
- EO.Wpf
- Overview
- Installation & Deployement
- Skin & Theme
- Common Taskes and Services
- EO.Wpf Buttons
- EO.Wpf Calendar & DatePicker
- EO.Wpf ComboBox
- EO.Wpf DockView
- EO.Wpf Gauge
- EO.Wpf ListBox
- EO.Wpf Menu
- EO.Wpf MaskedEdit
- EO.Wpf ProgressBar
- EO.Wpf Slider
- EO.Wpf SpinEdit
- EO.Wpf SplitView
- EO.Wpf TabControl
- EO.Wpf TreeView
- EO.Wpf Utility Controls
- EO.Wpf WindowChrome
- Sample Data Objects
- Common Topics
- Reference
| Using Simple Splitter |
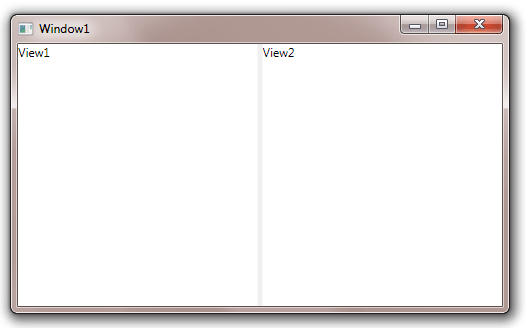
To use EO.Wpf SplitView control, simply define its View1 and View2 properties:
<Window x:Class="Test.Window1"
        xmlns="http://schemas.microsoft.com/winfx/2006/xaml/presentation"
        xmlns:x="http://schemas.microsoft.com/winfx/2006/xaml"
        xmlns:eo="http://schemas.essentialobjects.com/wpf/"
        Title="Window1"
        Height="300"
        Width="500">
    <eo:SplitView>
        <eo:SplitView.View1>
            <TextBlock>View1</TextBlock>
        </eo:SplitView.View1>
        <eo:SplitView.View2>
            <TextBlock>View2</TextBlock>
        </eo:SplitView.View2>
    </eo:SplitView>
</Window>
The above code produces the following result:
User can then drag the gray splitter bar to resize the splitter.
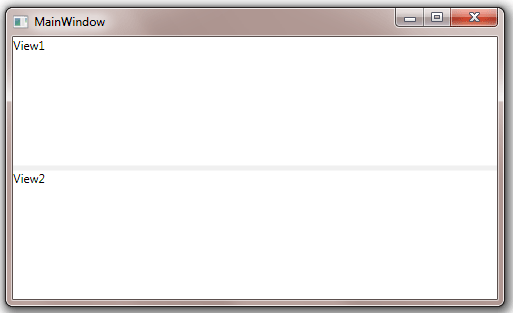
By default, the SplitView's Orientation is Horizontal, in which case the splitter bar divides the screen horizontally. You can set the SplitView's Orientation to Vertical so that the splitter bar devides the screen into top and bottom section:
<Window x:Class="Test.Window1"
        xmlns="http://schemas.microsoft.com/winfx/2006/xaml/presentation"
        xmlns:x="http://schemas.microsoft.com/winfx/2006/xaml"
        xmlns:eo="http://schemas.essentialobjects.com/wpf/"
        Title="Window1"
        Height="300"
        Width="500">
    <eo:SplitView Orientation="Vertical">
        <eo:SplitView.View1>
            <TextBlock>View1</TextBlock>
        </eo:SplitView.View1>
        <eo:SplitView.View2>
            <TextBlock>View2</TextBlock>
        </eo:SplitView.View2>
    </eo:SplitView>
</Window>
The above code produces the following result:
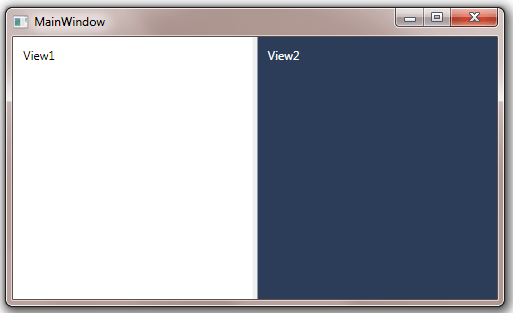
View1 and View2 each are placed inside a Border control, which is then placed inside the left or right section of the SplitView control. You can use View1BorderStyle or View2BorderStyle to customize style for these two Border elements. The following sample uses these two properties to add a padding for both View1 and View2, and also set View2's background:
<Window x:Class="Test.Window1"
        xmlns="http://schemas.microsoft.com/winfx/2006/xaml/presentation"
        xmlns:x="http://schemas.microsoft.com/winfx/2006/xaml"
        xmlns:eo="http://schemas.essentialobjects.com/wpf/"
        Title="Window1"
        Height="300"
        Width="500">
    <eo:SplitView>
        <eo:SplitView.View1BorderStyle>
            <Style TargetType="Border">
                <Setter Property="Padding" Value="10"></Setter>
            </Style>
        </eo:SplitView.View1BorderStyle>
        <eo:SplitView.View2BorderStyle>
            <Style TargetType="Border">
                <Setter Property="Padding" Value="10"></Setter>
                <Setter Property="Background" Value="#2c3d5a"></Setter>
                <Setter Property="TextBlock.Foreground" Value="White"></Setter>
            </Style>
        </eo:SplitView.View2BorderStyle>
        <eo:SplitView.View1>
            <TextBlock>View1</TextBlock>
        </eo:SplitView.View1>
        <eo:SplitView.View2>
            <TextBlock>View2</TextBlock>
        </eo:SplitView.View2>
    </eo:SplitView>
</Window>
The above code produces the following result: